We are getting ready to preserve nearly two acres and transform it, like we did our last two properties, into a permacultural wonderland of native, edible and medicinal perennials, pollenator gardens and habitat for a variety of creatures. On our second walk-through at the property, we frightened a muskrat who looked fat and happy but for the fact that he was awakened and had to run a long way for cover. We would definitely improve that critter's habitat! Our earlier goal of saving 80 acres remains our ultimate goal, but this property has an established caretakers home and two greenhouses. We would have to raise four times as much money to build in all those improvements on 80 acres. Not to mention the infrastructure needed to even set up such a facility. As an added bonus, instead of being 3-5 hours from major population centers, there will be a million people within bicycling distance! Talk about offsetting carbon footprints!Even more interestingly, we will be just of fth eIce Age Trail and will be able to offer no trace camping to through hikers!
Trouble is, I'm not going to sugar coat it, money. Due to covid-19, it has been two full years of less than half my normal professional gig that allows me to fund the work that ECO-Tours has done. We are adept at soil restoration and teaching about how to make and use biochar. Spreading seed and re-establishing native cover. There have been many events where contributions have covered gas or lunch, but often not both. We can afford to operate on exremely small budgets, whether we are tree planting, seed collecting and dispersing, teaching classes or doing intrerpretive programs because our labor and management have always been 100% volunteer. It took us our first ten years to do, but we planted 60,000 tree seedlings across Northeast Wisconsin and we raised less than six thousand dollars a year during those years.
We were able to do it because we got creative. One of us would wait around, until after pick-up hours at the annual Department of Natural Resources tree seedling distribution event, many years hundreds of trees came home with us that otherwise would have been thrown into the compost. In fact, the year before the first year we put in our order, I had been walking past the greenhouses at the County Extension Offices. Out back I found over 2,000 tree seedlings in their compost. We took them home. potted them up and it took a while, but we got nearly all of them set out into permanent and appropriate places, their forever homes, within that first spring and fall. After I found that treasure, I went and asked why they had thrown them out and they said that every year, when they did the DNR tree seedling sale, some live plants would not get picked up and they didn't have any way to store them or hold them for later pick up, so they just put them in the compost pile.
I made sure after that to always show up at the beginning of the day to help set up, then to fill my order as late in the day as possible, so I could help after they shut down. After two or three days of getting people paired with their orders for pick up, everyone woul dbe pretty tired and the idea of taking a hundred or a thousand trees home ot plant is too much for anyone to think about, unless you are someone with friends who will help pot them up and eventuqally come help plant them out on another day, which we did. Inevitably there would be at least a few dozen left over seedlings. Most times there were many hundreds and once or twice over a thousand free trees to help keep our costs down. The real value was in all the loving hands that helped pot them all up and those loving hands that came later and lovingly placed them in the ground. Indeed, the loving hands of those who pulled competing weeds were also necessary to have the thousands of sucessful trees, spread across many hundreds of acres that would have never grown without the participation of many hundreds of people who care.
The reason that I mention this is to point out that rather than contributions being eaten up by administrative or fund-raising costs, our dollars flow with power and immediacy to what needs funding, not advertizing and gala events for megadonors. Give what you can. If you would like to stay in the loop about our events, which are mostly centered around Wisconsin let us know at: biocharmaster@gmail.com or if you would lik eot purchase a class, We can teach you everything you need to know to make top quality biochar in just a few hours by phone or online through zoom or fblive. Any contribution of fifty or more gets you a class if you would like to start sequestering carbon forever. If you are having trouble with our paypal link, you can go there directly and use our account number, tnsaladino42@hotmail.com or, you can go to our gofundme page and contribute to "Save 80 acres of Wisconsin for outdoor school".
These trees were some of the first we planted and this image is from ten years ago. The last time I was past the farm, they were taller than the house! They are also large enough now to shade the west side of the house from summer sun and winter wind. The energy savings alone is like offsetting carbon use that is now unnecessary. In very real ways, we continue to prove that the best time to plant a tree is twenty years ago, the second best time is today!
Again, please contribute what you can.
All-volunteer NPO (Non-Profit Organization). Money raised has helped us teach many hundreds of people about making and using biochar to sequester carbon much more quickly than we could do with tree planting alone. We are developing a traditional ways school based on ecological facts. Donations are always graciously accepted at, 1111Clark Street Algoma, Wisconsin 54201. We would love to develop a unique tour for you! Blessed BE!
ECO-Tours only purchases trees and dirt to plant them in...
Showing posts with label soil. Show all posts
Sunday, February 6, 2022
Wednesday, January 12, 2022
Six Steps Making Char
Six steps required to make the best biochar. Alternjatively, this could be called, "NO Time to Wait!"
The short answer is making, moisturizing, micronizing, mineralizing, microbes and maturation. The next six posts will review what is meant by each of these terms. If there are editorial comments or questions, please let me know. It will make a lasting difference. Always, always, always, remeber that quality works by example and invites reciprocation. Making Char This first step in creating of biochar. In essence, all you do is heat dry plant material to between 450 and 500 degrees F (230-260 C), basically making it glow, without allowing air to get to the reaction site. This process is called pyrolysis. When the material glows, it changes form and makes it like more like fired clay, than wood or dirt. when vitrified, ut becomes permanent in the environment and not subject to degradation. Charcoal has been made around the world, throughout human history. When human beings learned of the power of char, and how it is turned into biochar is still a mystery. It is well established that as recently as 2,000 years ago, humans were making it and some tribes and cultures still use this practice in modern times. It is sad that intact cultures are referred to as primitive, because they are often far more scientifically advanced and sophisticated than that term implies. Utilizing biochar is one of the indicators of a highly advanced agriculture. My tool of choice in the matter of making char is a retort, a basic scientific instrument designed to allow heating and vapor release, without introducing oxygen (air). Typically, the retort has but one opening to allow gasses to escape, mine actually has three, but they can be closed during cooling. Here is a schematic view of a retort. Below is picture of my old retort in use and I have made other types of charring equipment as well. It is important to understand all the ways to do this step, so you can pick the one that suits your needs, available resources and needs. In my classes I discuss at least five types of charring techniques, the pit or flame cap, build and bury, similar to how much char was made before the fossil energy revolution and the current infatuation with liquid fuels; retort, of course, because it is my preferred method, the can within a can (which pretty much explains itself) which could also be called a retort in a chimney, and the TULD, Top Lit Up Draft. The method you choose varieties depends on how much you are making, what materials you have available and how pure you want/need to make your char. In addition to teaching facts about biochar, making and using it, I try to get across a feeling, or attitude of appreciation and the desire to teach and share with others the ancient miracle that is biochar. Making char requires nothing more than a basic popcorn, cookie or cracker tin. Just pop a few holes in it to release the gasses and fasten the lid on with self-tapping pan head screws, then char away. You can even use dry garden clippings, woody yard waste or herb stems, any dry woody debris will do, as long as it is completely dry. Typically, I just put the whole container right in the fire pit while enjoying a camp or bonfire. At first, the container smokes a little, but then the flammable gasses come off, making pure clean flame. When that flame dies down, and disappears, even if you shake the container around, it is finished. Lay it on a surface that won't burn with the holes you poked facing toward the ground to smother off as much air as possible from getting into the container. When it cools, it is ready to start processing. Beware though, wood and sawdust, or organic material is a good insulator, so the coals may stay warm for several hours or more depending on how large a container you use. 
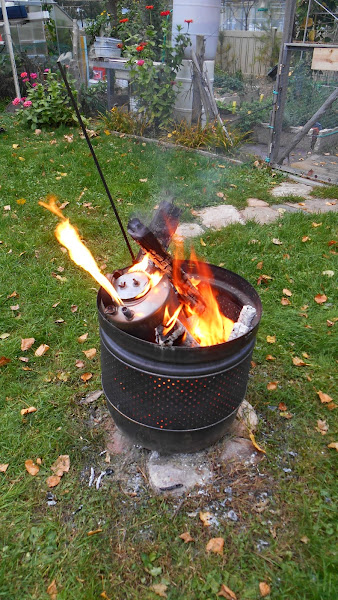
This retort is made from a Cornelius keg, it holds five gallons of material (I prefer dry sawdust) and reduces to approximately one kilogram of material. Making char from sawdust eliminates the need for micronization, because the pieces are small enough to be used without further smashing into powder. A typical firing of a retort like this takes about three hours with dry sawdust used for the feedstock, or parent material. The value of this will become evident in later posts. (see Micronizing) As in nature, stacking functions is the key to increased efficiency. 
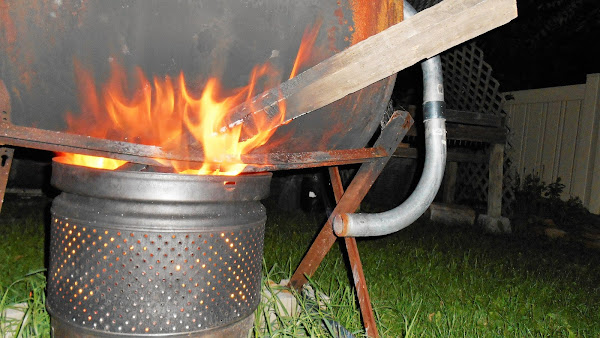
I did not have a big enough fire pit to roast the material in this retort, a sealed 55 gallon drum, with conduit to direct the gasses out the bottom. Although it worked well enough to produce the flammable gas, it was just not enough to help warm the drum. Had I been able to build a larger bonfire, it would have been able to make over ten kilograms of finished char. That would be enough to amend a ten foot wide bed forty feet long to a depth of three inches. 
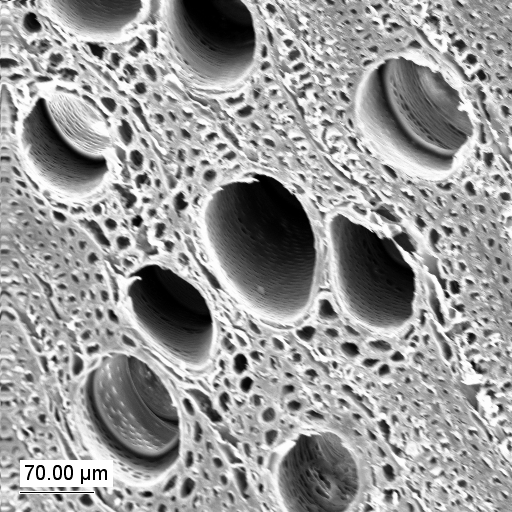
If you are not able to make a fire for some reason, you can use high end charcoal that is readily available at grilling outlets. Typically it has names like natural charcoal, cowboy charcoal or lump charcoal. Essentially it should appear like burned wood. If it has been compacted into uniform briquets, typically it will have contaminants and binders that reduce the quality of your finished product. In this case, I must admit that I am a bit of a carbon snob. The goal is to get the open grains of the wood's cellular structure, binders, paint, stain and other foreign material can close the ends of the pores and render the finished product either contaminated or useless. If you had a scanning electron microscope, tiny particles of the finished product would look like this: It is really that simple. Dry organic, woody material, the cellular structure of the plant is what gets preserved at approximately half size. As the material is heated, the gasses liberated are nearly pure oxygen and hydrogen, these flammable gasses must be able to leave the retort and they will readily be burned off during the process. The nice thing about the retort is that when the gasses stop coming out, you know that the char is done roasting. After removing the retort from the fire, loosely plug or cover the hole(s) to keep air out and let the char cool. Another way to tell if the char is done is to feel the weight of the container. When finished, the char is very light and when you touch finished char, there will be very little black carbon that sticks to your hands. Incompletely fired or poorly pyrolized char will still have oily soot-like residue. It gets your hands dirty when you handle it and it will smell or taste of creosote. A good way to tell if char is finished is to smell or taste it. There will be no taste or smell. The best char, is pure carbon. After it cools, if you stir the pieces, it will almost sound metallic or like broken glass shards, especially after it is moistened, but that will be covered in the next post. Poorly made char can degrade as it breaks down in soil, so take care and do whatever it takes to make the best char possible, it will reward future generations, many times over, not only for seven generations, but for geologic time. There are other ways to make char and they include something called a flame cap burner, basically a container that does not allow air in either the bottom or sides. In this method, you have to build a rick. (a rick is like a log cabin, but the logs are layered from side to side like a nearly solid floor on each level, but to maximize air flow, room is left around each log, stick or branch, not like a solid floor of wood, but a lattice in three dimensions.) A small fire is built atop the rick and when the material burns down, you will notice that the fire only exists at the top of the vessel, where air first contacts the hot gasses. Material inside will just glow, but not burn. Keep adding material until all that is left is the glowing bed of coals, when the flame cap stops burning, the gasses have all been released, the char is done and has to be quenched with water or have a loosely fitting lid ready to cover the vessel to keep air out. This method is great if you do not have strict burning regulations because it gets smoky if you put too much material on at once. The ideal rate for adding material to the flame cap burner is evidenced by the absence of smoke. You want a very clean burn, if you get any smoke, either you have put too much on at once, the inside of the container is not hot enough, or the material is too wet to char. This can even be accomplished by just digging a hole in the ground and building your fire large enough to fill the pit with glowing embers. Quench or smother them out with the soil that remains from digging the hole. It is "primitive", but if you know what to do and how to know it is done, it can work beautifully. The TLUD (Top Lit Up Draft) burner and the vessel within vessel method are also useful if you have the materials and metal-working skills to make them. First, for the vessel within a vessel technique, you would need a small, sealing, steel container and it would need to fit within another larger steel container, I have seen them made from a 30 gallon drum inside a fifty five gallon drum. Holes are made in the bottom of the thirty gallon vessel 2-4 inches (5-10 cm) up from the bottom, to allow gasses to escape. This container is then filled with the material you are going to char and sealed. The larger drum also has holes in the bottom and is kept up off the ground at the start to let fresh air in when lighting the fire, but since they are in the bottom, when the burn is complete, you can pretty much seal them closed by simple lowering the container to the ground. The larger drum also has a lid, but it needs to have a hole prepared to accept a stovepipe. About six feet of stovepipe above the penetration in the lid, to keep all the smoke up and away from people. This device is very smoky upon starting as can be the TLUD In any case, the large drum gets propped up off the ground to start the burn, the smaller vessel, once filled with material to be charred and the opening of the drum is sealed, it goes into the larger vessel, atop a bed of tinder and other fire starting material, vent holes down. The inner drum is propped up off the bottom as well. The space under the smaller vessel holds the kindling wood and helps air to flow upward during the main burn. The next step is to be to fill the space around the inner drum with dry, burnable material An easy way to start the burn is to make ready some coals, like you would use for grilling, dump them down into the tinder and quickly fill the drum with the wood, quickly capping it and installing the stovepipe. As the outer wood burns, it begins to heat the inner drum and as that happens, flammable gasses begin to escape making the fire hotter. Eventually the smoke stops as the outer sleeve of wood goes to char, then ash, but by then the additional heat, from the escaping gasses leaving the inner vessel, continue to burn, also heating the inner vessel. This allows it to finish the process. As the material finishes, less and less gasses are produced until there is no more flame, just glowing coals within the inner vessel. At that point let the outer drum drop to the ground, sealing out the air. Some people like to throw a "seal" of sand around the edge, or do that and then moisten the sand to help keep out the air that could get in the bottom. I have not worried about it and done well, just getting a good solid seal on flat ground. To reduce the updraft of the chimney, which could draw air in the bottom, you could add a flue damper. The TLUD kiln is similar to the flame cap, but the flame essentially working its way to the bottom, using up all the available oxygen before it can burn the char all the way to ash. I'm not completely thrilled with this technique because some creosote residue might be deposited on the finished char. I have not fired one myself and it requires one to not have to worry about making lots of smoke, again when you get it started, it will smoke to beat the ban, until the flame front gets established. In a TLUD kiln, it works like the flame cap, but the air coming in the bottom is severely limited, and the flame actually advances down from the top, as it goes toward the small amount of air, it uses up all the oxygen in the process of burning and the hot material left behind is hot enough to continue to give off gasses. In this sort of kiln, typically, they run a stack with an afterburner to burn off the gasses when they finally get out into the air. These can be impressive and may bring to mind a fire breathing dragon! To my understanding, having the material loosely packed in the kiln is crucial to success, you can't pack the material in the kiln because the air flow, although small, is crucial. When packing the TULD kiln, the feedstock needs to be about as dense as a natural sponge, so air flows around and through the material, rather than if it were packed tightly, or irregularly, it would choke off the air flow, burn unevenly or only partially char. I plan to make one of these and try it for myself. The people who use them swear by them. You can put any vessel over fire, as long as you have somewhere the flammable gasses can escape. When the gasses stop coming off, if you stir the material and the flame does not continue, or flare up, pull it from the fire and put a loose fitting lid on it, seal it with the ground, or quench it out with water, because as it contracts, air will make it into the retort, but the goal is to not have it touch any glowing char that has not yet cooled below 400 F, otherwise it could continue to burn when oxygen gets in. I have had batches where the integrity of the seal was compromised and the char continued burning for over ten hours, without me even noticing. I went to sleep and in the morning, the container was still warm, opening it revealed the embers had consumed almost half the char! When making char in any sort of retort, it is important to wait until the material is fully cooled before exposing it to the air. If you do not, it can reignite on contact with air. The still warm char gets wasted when it turns to white ash. Keeping this white ash production to a minimum in all but the most acidic of soils and getting the highest percentage pure carbon as possible is the goal. It is critical to getting the most from your effort. The most important thing to remember about white ash, is that it is very alkaline, lye is made from fully burned ashes. DO NOT USE white ash. It is no longer carbon, even that gets burnt. Once burned to white ash, only minerals remain. We want the carbon, that is what benefits the soil, when it becomes fully pyrolized. Wood that has not fully charred will decay and lose carbon as well, so make sure that you fully char the material you use. The embers must glow and completely, lose all their hydrogen and oxygen. Pure, vitrified carbon will remain fixed in soil for geologic time. Once prepared this charred material has fourteen acres of surface area per handful. All that surface area needs to be nourished to become a healthy precursor to soil. That is whay the next five posts will cover. Basic science rules those phases, but for now, keeping with the title of this post, making char is easy, if one has some simple tools, a fire and patience to make sure your woody material is fully finished before you remove it from the fire. I will cover more about the golden ratio of minerals and nutrients, in the post "Mineralization" If you choose to make a retort, vessel in vessel, TULD burner, or use a flame cap method, the only requirement is to have complete pyrolysis without either un-charred material or white ash. The best tests for quality are look and feel, smell and taste. It should be ultralight and the darkest black you will ever see. Occasionally it may have a rainbow oxidization, but the predominant feature is to be super black (the best char sounds a bit like glass when pieces are touched together. You will hear a hollowness to the pieces and they will be very light) Testing char quality by smell, (should smell fresh, not like creosote or smoke) Char is a great deodorizer. There should also be no taste; again, smoky or oily flavors are evident straight away. Material not thoroughly heated for long enough will smell like smoke. Excellent char will not taste like anything, in fact, the predominant sensation is that it sucks moisture from your tongue. Truly an anti-taste. This material is so much more valuable than gold, I cannot begin to tell you. This beginning ingredient, char, when treated and processed properly will double crop production when added at the rate of one kilogram per cubic meter of soil, or roughly two pounds per cubic yard. If anyone ever needs help determining how much char they need, please contact me directly. My land line is nine twenty, double 8 four, triple two 4. Mornings in Wisconsin (Central Time) are the best time to reach me. Best wishes on your journey. When you use your char and see the benefits, think about who taught you how to make it and send a token of thanks. Think long and hard about the principles within sustainability, which urge us to equitably distribute the abundance. That is all I ask. Ubuntu as they say in Africa, namaste' as they say in India. We are each incarnations of the godhead and without a single one of us, all would be diminished. I truly am, because of you! Appreciatively, Tony C. Saladino
Saturday, August 21, 2021
Lake Superior Traditional Ways Gathering
Char created, approx. 130 gallons everyone who received char also received instruction on turning it into a forever soil amendment that will enhance the habitat available for the soil microbiome for tens of thousands of years!
This was my process laid out to mimic the timeline. First, on the left, a small retort made from a dog dish and a lid found at St. Vincent DPaul thrift store as well as a cookie tin and self tapping screws. When making char using a retort like this, you need to put your dry woody material inside the tin, secure the lid with three self-tapping screws, then poking a few holes in the top to let the flammable gasses escape. The evidence that you char has finished, is when th egasses stop coming out, to cool, just flip the container upside down, holes down on a relatively flat surface that is fire proof.
Between the two retorts for making char is a one ounce chunk of completely pyrolyzed char, propped up on an herbal supplememnt container. For scale, the container is just over four inches (10.16 cm)tall and two inches wide (5.08 cm) on the bottom part The white lid is 2 1/8 inches (5.4 cm)across.The one ounce chunk easily fits inside. Just a handful of char has fourteen acres of surface area, so adding the proper amount of nutrients, minerals and essential life takes time. The next two items can be interchanged, but the best end of the wood to mount the crusher was after the screening step. In fact, they must be interchanged, until it is crushed, it can't really be screened. I heard of an event that took place this weekend, where three and a half tons of char were "danced" down into small particles! That will be some seriously energized material!
The crusher in small scale can be a hand crank coffee mill. Larger scale crushers can be made from concrete mixers with a few boulders in them, hammer mills and grain mills are also serviceable. A functional large scale screen can also be made by inserting 1/8 inch (2mm)screen inside a slotted 55 gallon drum, then rolling it on a tarp or over a wheelbarrow. Again, for maximum efficiency and carbon free operation, human powered units count for more carbon storage points than electric ones.
Beyond that, of course are the nutrients and minerals. I found an eloquent way of saying succinctly what folks need to know about nutrients and minerals. Add nutrients and minerals that are abundant under your management scheme and cultural practices. That allows each farm to understand the words the way their scale and particular land offers. If you have livestock and manure is available, use it! If you have slaughter operations, or catch a lot of fish, use that waste! As many sources as you can get, added a little at a time. When you can't have the scent of the nutrients disappear after stirring the char for a few days, stop adding, you are approaching stauration!
Between the black box and the blue box, is where the longest part of the process takes place, adding microbes and allowing time for their maturation. Think of it like having a pet for about six to ten weeks. During this phase, you need to check on and stir your 3-D black petri dish two to three times every day. At 14 acres (5.6656 ha.)per handful,microbes need many, many generations to populate it.Since most of them are not very mobile, the stirring helps tranfer them surface to surface, so stir them with love and compassion, you don't want to be aggressive and violent about the stirring, but just take some effort to thoroughly mix the material, it really helps get the transfer to take place. If youhave done well, providing a wide varit=ety of nutrients and minerals will enhance the availability of habitable space when the ransfer is complete.
Several "tricks" exist for getting good microbial communities. It does not hurt to have them be local either, the stronger the members and local winners of the local microbiome, the stronger your biochar will be. Find the best microbes under compost heaps, elder trees wherever your best soils are, or make a compost tea. Try a little of all three! The blue topped container is the biological "test" that I use to determine whether char is "done" or not. The sides, which I temporarily segregate with a small piece of cardbord, are labelled "WORMY SOIL" and "BIOCHAR" I fill the two sides, then remove the cardboard, loosely cover it overnight in the garage or basement. If the worms can be found on the biochar side the next day, it is ready to be released into the environment. I have had them reject the char and after stirring and keeping th emoisture level perfect, abotu a swet as a wrung out sponge, they deemed it finished!
At the very end were a few containers of crushed, charred material that I had for sale, enough to do three to five gallons and a larger one that would be enough for a four by four foot (1.2m X 1.2m) bed.
After the burn, the tools were packed up and the buckets were filled with finished char. We also had a few larger volume containers, a couple thirty gallon ones and a twenty gallon one, plus a half dozen containers large enough to hold two grocery bags full each. It was a veritable char fiesta!
Location:
46.607100, -90.600000
Subscribe to:
Posts (Atom)