
Showing posts with label cycling. Show all posts
Showing posts with label cycling. Show all posts
Wednesday, January 12, 2022
Microbes
Again, we need to start with an object lesson. Imagine a cow and her calf, on an acre of healthy soil. Science has calculated that the microbes on this same acre of soil have about the same mass as Bessie and her calf. I have heard the claim that billions of organisms live in a tablespoon of healthy soil as well and I'm sure that the scientists are right, even though I can't see things that small and I will never be able to see a germ, flagellate or bacterium no matter how good my eyesight is! In my "initial contact" flyer, I have this to say about microbes,
"The biochar ecosystem provides all that soil microbes need, security, moisture, air and healthy food. Microbes can be added by using compost, or healthy soil. Waste products of microbes that live in soil, often as many as billions per teaspoon, actually feed healthy plant roots."
Microbes can be added by including some compost or compost tea in the mix. Some commercial mixtures are available that tout themselves as compost starter, etc. but the truth of the matter is that spores and bacteria are on the wind. It may be difficult to get a representative sample large enough to really get the char to transform into biochar, but in theory, time is really all that is necessary to get the microbes to take up residence there. I typically start to see insects hanging around my char after it gets minerals and nutrients added to it. Whether they are trying to eat some of the bits of rotted food, or harvesting smaller organisms that I cannot see will have to remain a mystery. I certainly don't shoo them away, because I see them as vectors for getting more beneficial microbes into the mix. To make compost tea, you just need an air pump, like you would find in an aquarium, some tubing you can weigh down with a rock , a five gallon (20L) bucket of water, and a quart or so of compost. Set the bubbler up so that there is a constant stream of bubbles in the bucket, then add the compost and let it go, bubbling away for 24-48 hours. The air is essential to getting a healthy representative sample of microbes. Adding some of the resulting water to the char after it has been made, micronized, moistened and mineralized will allow the microbes direct access to the territory that has been prepared for them.
Of course, there are far more idiosyncrasies and special circumstances to deal with than a short post can include, but for the most part, in the vast majority of locations, you can utilize local resources to make highly effective biochar. Jumping back to the previous post, "Minerals", nitrogen, an important soil constituent, can be added to char through the use of many different ingredients. Some of the best char I have ever made began as 75% grass clippings by volume and 25% char. Another excellent batch started by moisturizing it first with pure, fresh fallen snow. Once material breaks down or concentrates, less is needed. Most of the nitrogen in the batch I mentioned got a lot of moisture and loads of nitrogen from moist grass clippings. Additionally, I added urine every time it dried out enough to soak it up. Nitrogen can come from blood meal, bat guano, fish emulsion, urine (urea) and virtually any manure or offal. As you can imagine, the bacteria which break down these materials are typically present, if not common in soil. When needed, they proliferate quickly and die out after their food supply disappears. Remember though, even dead microbes feed the next generation, it is the cycle of life. Whether you make biochar with manure or urine is not as important as the fact that microbes can grow on either, or both. If animals are fed anti-biotics, this is less so. The goal is not so much to culture a specific set of microbes, but a flourishing, diverse community that utilizes all wastes, from all the different microbes, their predators and competition as well. In diversity there is balance. I often think about how much better off we would be as a civilization, if we accepted this, or at least understood the need for diversity among our human population also.
Char itself helps to moderate extremes as do the organisms who live on and in it. So does the water that it holds. Mitigating and ameliorating change is helpful for the whole soil biome. Instead of trying to give crops what they need for just one season, or rotating crops periodically to help the soil stay healthy, utilizing biochar requires us to take a much longer view of soil health and conservation. Once we put all the time and effort into healing the soil, building up the soil biome, we are loathe to abuse it or let it blow away. My county here in Wisconsin Brown County, holds the state record for the most soil lost to erosion each year in our entire state. Perhaps if people decided to value this finite resource, we would get true conservation started. Understanding that healthy food leads to healthy humans is perhaps a stretch for some who sit behind the wheel of a tractor, but we can't continue living as if it did not matter or we threaten our very existence.
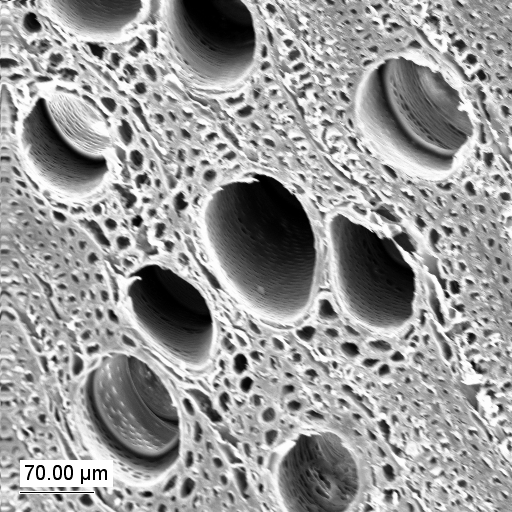
Just as we have become aware of the micro-biome in the human gut, we need to also become aware of the science behind the micro-biome as it relates to soil health. Estimates of the value of the gut bacteria in our health range up to claims that 80% of our immunity comes from the gut. In soils, there can be billions of microbes in a tablespoon and millions of types and strains can live in close proximity to or atop one another. Like the unbroken forest that we hear, used to cover the Eastern United States, in which a squirrel could travel branch to branch, without touching the ground from the Atlantic Seaboard to the Mississippi River, microbes inhabit healthy soil, cheek to jowl upon each and every soil particle. Biochar exponentially expands the amount of surface area upon which they can thrive.
Microbe habitat waiting to happen. Atmosphere is automatic, moisture allows life to flourish, organic material, minerals and nutrients are needed by all life, even microbes. Meeting their needs is paramount to growing healthy soil. Remove just one necessary resource and life gets stunted or fails to thrive. Boutique biochar, such as I teach people to make, transforms soils immediately and lasts for geologic time. Valuing a technique that more than doubles crop production, forever, has an infinite value. What is this knowledge worth to you? Please remunerate me for my efforts and sharing with capital. You can send money through Paypal at account number: tnsaladino42@hotmail.com which also happens to be my e-mail. If you would like to contact me that way, I have brochures that you can use to spread the word about this ancient miracle in your local community. I can even Skype in on fire pit parties where you would teach others the same sort of class that I do. Humans must emulate natural processes and seek a state of peak evolution by mimicking nature's way of stacking function, producing nothing considered waste, just recyclable materials anxiously awaiting their chance to face the crucible of change. In soil, every trophic level can serve as top predator. This layers multiple levels of living carbon, inhabiting these surfaces, covering them with a micro climate that is warmer, because of metabolism. That warmth is held because soil air has a bit more carbon dioxide than the air we breathe a result of microbe metabolism. All good things for the rest of the community.
Just as we have 75% water in our bodies as newborns and it slowly dwindles as we age, down to fifty percent water when we are elderly, microbes have a high percentage of water within them as well; like us, over time, they begin to desiccate, even though the cell walls try to hold on to moisture, it inevitably reduces with time. Up to 75% of the water in soils can be bound within the cells of microbes. This moisture allows metabolism within the cell, but also makes the exchange of gasses possible, helps stabilize soil moisture and moderates temperature. Building the base of the soil food web invites heterotrophs and macro-invertebrates. Microbes that can not be seen with the naked eye are difficult to explain or understand, but the most important thing to remember is that less desirable ones tend to make dank, musty or off smells. The less desirable microbes also are more tolerant of conditions that have limited amounts of oxygen. 85% of bacteria are either innocuous or helpful to humans, many lend their aroma to healthy soil. You probably know what good, healthy soil is supposed to smell like, so too our body is able to sense bad organisms by smell too. With the pathogenic ones, typically you can overcome them with creating conditions favorable to beneficial organisms. Being careful to not let stagnant water develop, aerate more, stir the biochar more often and be careful to balance the amount of nutrients available and the amount of minerals and detritus as well. some less composted material is not bad either. Typically, I have found that in making good char about ten times more nutrients, especially nitrogen are needed by weight when compared to the amount of other minerals. If there is too much moisture, dry powdered minerals can help absorb it. Worm castings can also help absorb excess moisture. Balancing the moisture level so that the biochar never dries out, but never gets too wet is something that you will develop a feel for.
The typical make up of soil, as stated in previous posts, is 25% Air (soil atmosphere has more CO2 in it, from microbe respiration) 25% water, 40-45% minerals, 5-10% organic matter. Subdivided, this last 5 to 10% is 80% humus and ten percent each of roots, (both dead and alive), and organisms. Adding biochar, even at 1%, would provide habitat for more organic matter, most of which would be living creatures. These organisms are only 10% of that tiny 5% sliver of soil that is referred to as "organic matter" typically. The carbon matrix upon which biochar is designed and the pyrolysis process rendering it vitreous makes it both mineral, but immune to break down and able to foster microbial life indefinitely, growing habitat for these beneficial microbes, perhaps exponentially. This burgeoning microbial habitat helps stabilize soil moisture, holds minerals and nutrients and creates micro-biomes of better drainage, stucture and retention of moisture when it is available. It also raises soil temperature slightly as a result of microbial metabolism. All these benefits and carbon sequestration!
This is where all of the water that passes through and by me, into the Great Lakes wants to flow. The microbes life, health and well-being depend on moisture. Just like we humans how much water they have inside their cells will determine how well they can function.
I realize that the discussion is currently about microbes, but the amount of habitable surface area the char provides depends on making the char a fine powder (see "Micronize") with the largest pieces being smaller than 2mm. About the width of Eisenhower's ear on a dime. The structure inherent in char unleashes massive amounts of surface area, the smaller you crush it, the more available surface area, the smallest powders we are typically able to produce are still cavernous for a microbe. Sorry for the repetition.
There is much for us to learn when we build soil this way. One of the most important things to understand is that all soil microbes are interdependent. When any overpopulation occurs and death of one group of organisms occurs, it is not a horrible loss, because others pick up the slack and pitch in to return the soil food web to balance. This interdependence and alliance of all in the community to work for the betterment of conditions for all other organisms is something human creatures need to take to heart as well. The complex interdependent relationships that occur naturally in soil need to be emulated and used as templates for layering functions withing our own lives and the human community as well. I wish you all a future of security and abundance and when we realize that it is unnecessary to deprive some "other" to take care of ourselves, many problems, many traumas and untold destruction will be avoided.
Six Steps Making Char
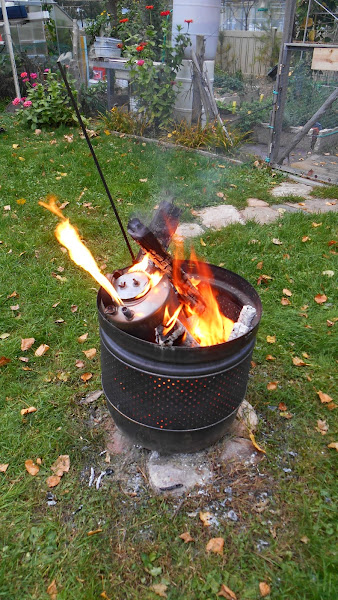
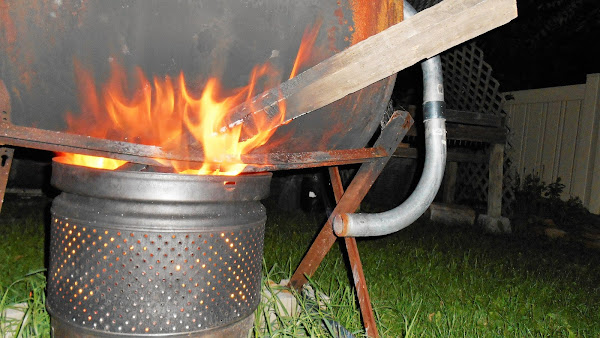
The short answer is making, moisturizing, micronizing, mineralizing, microbes and maturation. The next six posts will review what is meant by each of these terms. If there are editorial comments or questions, please let me know. It will make a lasting difference. Always, always, always, remeber that quality works by example and invites reciprocation. Making Char This first step in creating of biochar. In essence, all you do is heat dry plant material to between 450 and 500 degrees F (230-260 C), basically making it glow, without allowing air to get to the reaction site. This process is called pyrolysis. When the material glows, it changes form and makes it like more like fired clay, than wood or dirt. when vitrified, ut becomes permanent in the environment and not subject to degradation. Charcoal has been made around the world, throughout human history. When human beings learned of the power of char, and how it is turned into biochar is still a mystery. It is well established that as recently as 2,000 years ago, humans were making it and some tribes and cultures still use this practice in modern times. It is sad that intact cultures are referred to as primitive, because they are often far more scientifically advanced and sophisticated than that term implies. Utilizing biochar is one of the indicators of a highly advanced agriculture. My tool of choice in the matter of making char is a retort, a basic scientific instrument designed to allow heating and vapor release, without introducing oxygen (air). Typically, the retort has but one opening to allow gasses to escape, mine actually has three, but they can be closed during cooling. Here is a schematic view of a retort. Below is picture of my old retort in use and I have made other types of charring equipment as well. It is important to understand all the ways to do this step, so you can pick the one that suits your needs, available resources and needs. In my classes I discuss at least five types of charring techniques, the pit or flame cap, build and bury, similar to how much char was made before the fossil energy revolution and the current infatuation with liquid fuels; retort, of course, because it is my preferred method, the can within a can (which pretty much explains itself) which could also be called a retort in a chimney, and the TULD, Top Lit Up Draft. The method you choose varieties depends on how much you are making, what materials you have available and how pure you want/need to make your char. In addition to teaching facts about biochar, making and using it, I try to get across a feeling, or attitude of appreciation and the desire to teach and share with others the ancient miracle that is biochar. Making char requires nothing more than a basic popcorn, cookie or cracker tin. Just pop a few holes in it to release the gasses and fasten the lid on with self-tapping pan head screws, then char away. You can even use dry garden clippings, woody yard waste or herb stems, any dry woody debris will do, as long as it is completely dry. Typically, I just put the whole container right in the fire pit while enjoying a camp or bonfire. At first, the container smokes a little, but then the flammable gasses come off, making pure clean flame. When that flame dies down, and disappears, even if you shake the container around, it is finished. Lay it on a surface that won't burn with the holes you poked facing toward the ground to smother off as much air as possible from getting into the container. When it cools, it is ready to start processing. Beware though, wood and sawdust, or organic material is a good insulator, so the coals may stay warm for several hours or more depending on how large a container you use. This retort is made from a Cornelius keg, it holds five gallons of material (I prefer dry sawdust) and reduces to approximately one kilogram of material. Making char from sawdust eliminates the need for micronization, because the pieces are small enough to be used without further smashing into powder. A typical firing of a retort like this takes about three hours with dry sawdust used for the feedstock, or parent material. The value of this will become evident in later posts. (see Micronizing) As in nature, stacking functions is the key to increased efficiency.
Subscribe to:
Posts (Atom)